


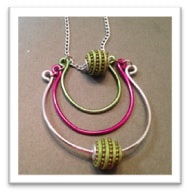
Circleque Pendant
By Christine Keller
I am always looking for ways to add color to my jewelry pieces and this piece is no exception. What I really like about it is that you can customize the colors to match whatever you want.
Lightweight and fun to wear, this piece will be sure to bring you lots of attention. Simple yet classy is how I would best describe it. The other great thing about this design is that you could make it with smaller or larger circles depending on the size wire you cut for it. The bead will set it apart so pick two matching nice ones!
I hope you enjoy it as much as I did creating it for you! Let’s get started.
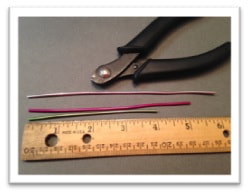
Materials List· 4” piece of 12 gauge wire- your choice of color- smallest circle
· 5” piece of 12 Gauge wire- your choice of color- middle circle
· 6” piece of 12 Gauge wire- your choice of color- outside circle
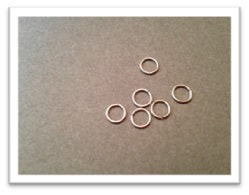
· 6 jump rings
· 18” piece of chain
· Pendant clasp- your choice
Tool List – Don’t forget Safety Glasses
Classic Chain Nose Pliers
· Round Nose Pliers
· Flat Nose Pliers
· Round Bracelet Mandrel
.
· Safety glasses
· Ruler
· Memory wire cutters
By Christine Keller
I am always looking for ways to add color to my jewelry pieces and this piece is no exception. What I really like about it is that you can customize the colors to match whatever you want.
Lightweight and fun to wear, this piece will be sure to bring you lots of attention. Simple yet classy is how I would best describe it. The other great thing about this design is that you could make it with smaller or larger circles depending on the size wire you cut for it. The bead will set it apart so pick two matching nice ones!
I hope you enjoy it as much as I did creating it for you! Let’s get started.
Materials List· 4” piece of 12 gauge wire- your choice of color- smallest circle
· 5” piece of 12 Gauge wire- your choice of color- middle circle
· 6” piece of 12 Gauge wire- your choice of color- outside circle
· 6 jump rings
· 18” piece of chain
· Pendant clasp- your choice
Tool List – Don’t forget Safety Glasses
Classic Chain Nose Pliers
· Round Nose Pliers
· Flat Nose Pliers
· Round Bracelet Mandrel
.
· Safety glasses
· Ruler
· Memory wire cutters
Step One
Begin by cutting the three wires you will need to make your circles. Be aware of what color you want where. Cut one 4” piece, one 5” piece, and one 6” piece. Use the memory wire cutter as this will not crush the ends.
Begin by cutting the three wires you will need to make your circles. Be aware of what color you want where. Cut one 4” piece, one 5” piece, and one 6” piece. Use the memory wire cutter as this will not crush the ends.

Step Two
Using the round bracelet mandrel, approximately half way down the mandrel, wrap the 6” piece of wire around, so the ends are not touching and there is a gap of about ¾”. Repeat this step with the 5” and the 4” piece of wire, moving farther up the mandrel each time.
If you don't have a mandrel, three different size wooden dowels could work.
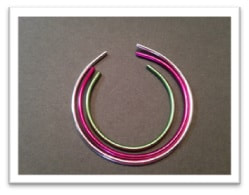
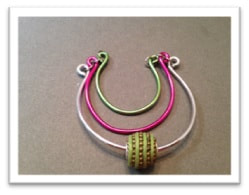
Your formed pieces should fit nicely inside of one another as shown in the picture.
|
Step Three
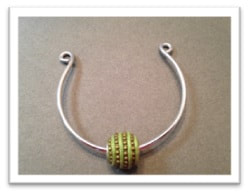
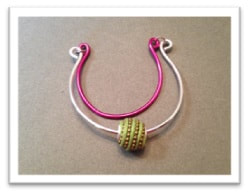
Slip your bead of choice onto the 6” piece of wire. Take the Round Nose Pliers and turning outward; make a loop on both ends of the wire. |
|
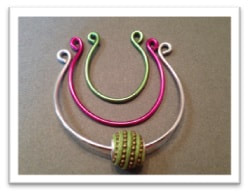
Repeat making loops on the ends of the 5” and the 4” piece of wire. The circles should still fit nicely inside of one another.
|
Step Four
Gather the 6 jump rings; it is now time to put this pendant together! Get your Flat Nose Pliers and your Classic Chain Nose Pliers. Holding a jump ring with the Chain nose, give a twist with the flat nose opening up the jump ring.
Gather the 6 jump rings; it is now time to put this pendant together! Get your Flat Nose Pliers and your Classic Chain Nose Pliers. Holding a jump ring with the Chain nose, give a twist with the flat nose opening up the jump ring.
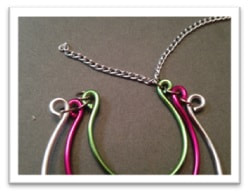
Starting with the 6” piece, lay the 5” piece inside and feed the open jump ring through the 6” loop into the 5” loop, and close the jump ring with the two pairs of pliers, closing just as you opened them but twisting it closed. Repeat for the second side
Repeat for the final 4” piece. Put the last two jump rings in the loop of the 4” piece to feed your chain through.
Step Five
After you have fed your chain through the first jump ring, stop and feed the chain through your second bead and then through the final jump ring!
After you have fed your chain through the first jump ring, stop and feed the chain through your second bead and then through the final jump ring!
|
Attached your clasp to the end of the chain and you are finished!
This is a fun design to play around with, changing it up by the color wires and the beads that you use and produce a whole different look! |